Search for Additional Articles
Installing FieldLink Office – Subscription License
Step 1: Trimble ID (TID)
In order to install your FieldLink Office Subscription License you will need to have an active Trimble ID (TID). If you do not have an active TID please go to the following link to create one. https://id.trimble.com/ui/sign_up.html
You will also need to make sure that your TID has been assigned a subscription license via the Trimble License Manager website. For more information on assigning a license to a User / TID please see the article about assigning a subscription license.
Step 2: Download and Install Trimble Installation Manager (TIM)
Use the link Below to download the Trimble Installation Manager (TIM)
https://www.trimble.com/installationmanager
Select “TIM for Windows – Online” and run the installer.

Step 3: Installing FieldLink Office via TIM
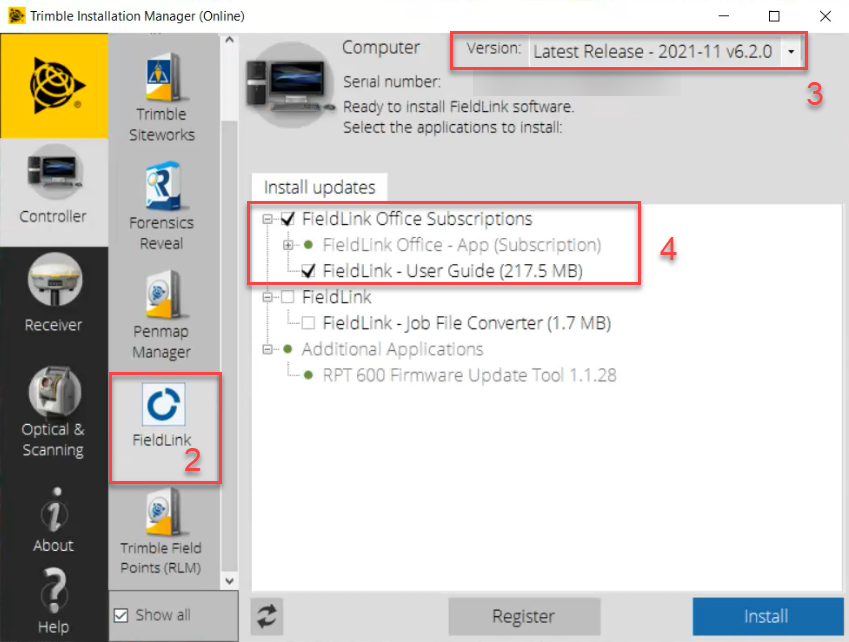
Once you have installed and launched TIM, please follow the instructions to install the FieldLink Office software onto your PC.
- Select the ‘Show all’ option.

- Select the ‘FieldLink’ button.
- Using the drop down carrot select the desired version of Trimble Field Points. The latest version of the software will always be listed first.
- Toggling the check boxes, choose if you want some or all of the options.

- Once you have selected the options you want to install you can then click the ‘Install’ button.
- FieldLink Office will be installed on your computer and you will be asked to log in using your TID once you launch the application.